LOADING...
How to create a Device-Triggered Scene?
- February 13, 2020
- by Ezlo Admin
With Device Triggered Scenes, you are able to control devices without using your app.
This enables you to enjoy one of the best things about a smart home system—the ability to tailor your smart home experience around each family member’s habits, personal preferences, and daily routines.
Our family of controllers now support device triggers, in addition to schedules, for complete customization and control of your smart home.
What are Scenes?
Scenes, which enable you to control multiple devices with just a tap, are one of the most important features of your smart home system. For example, with Vera the mobile app, you can group lights, thermostats, locks, and other smart devices, and control them all simultaneously based on a single trigger.
What are Triggers?
Triggers are a component of Scenes that allow you to create a customized reaction when you run a specific action in your smart home (e.g. if a motion sensor detects movement in the hallway, it can turn on all the hallway lights.)
How to create a Trigger
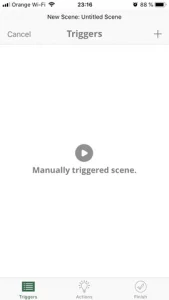
Choosing a Trigger is the first step in creating your Scene.
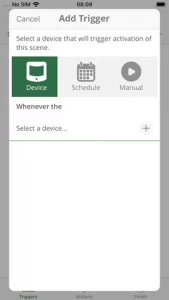
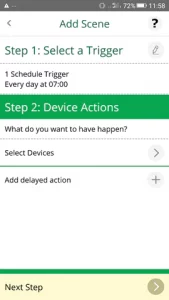
Step 1 – Pick a trigger
There are three types of triggers: device, manual, and schedule—The manual trigger lets you manually start a scene with the touch of a button, the schedule trigger sets the scene to run at a given time, and device trigger allows you to trigger a device or group of devices based on events like motion detection, or water leak alerts generated by other devices or app events.
Step 2 – Select an action
Once you’ve decided what trigger to use, tap “Actions” at the bottom of the page. Then tap “+” in the upper right corner of the screen and choose “What do you want to happen?”.
Choosing an immediate action will allow you to set your device to perform a certain action immediately after another device is triggered. As an example, when the outdoor motion sensor detects movement, instantly turn on the floodlights.
Choosing a delayed action allows you to pick a delay before the selected device performs the action. For example, we can set the scene to automatically turn the floodlights off after 2 minutes.
Step 3 – Wrap up the scene
There’s one last step between you and your first smart home automation: choosing the mode the scene runs in.
By default, your scene will run in any mode – home, away, night, or vacation. But you can, for instance, only allow the scene to run when in away mode. For example, if you have a scene running daily at 9 o’clock but only in Home mode, changing the mode to Away will override the scheduled trigger and disable the scene.
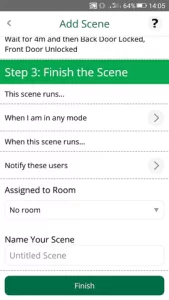
Choose who should be notified: You can have several family members assigned to your controller. Choose which of them you want to be notified of when the scene runs.
Keep it organized by choosing a Room: you can choose which “room” you want to assign your scene to. Alternatively, you can leave the scene unassigned (that is to say, assigned to “No Room”), which will have no impact on the way the scene runs.
As a final touch, you need to give your scene a name, for easy identification.
That’s it. You now know how to create device-triggered scenes for your Vera app.